Image Encryption System by Areas
Application to locally encrypt selected regions of images before storing them on a server.
About the project
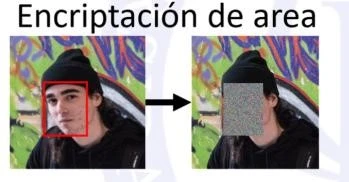
The objective of this project is to learn concepts of cryptography, security, and data encryption. To this end, an application has been developed that allows sections of images stored on a server to be encrypted. One use case for this application would be the publication of real-time security camera images, where the privacy of the people appearing in the images needs to be protected, while at the same time being able to view the original image if necessary.
How it works
When the application starts, it attempts to connect to the server, checks the validity and trustworthiness of its certificate, and, if everything is correct, continues with normal execution, where the user can view encrypted images stored by the server or log in to view their own decrypted images. In reality, certificate verification is performed each time a request is made to the server, so if the certificate changes, the application will detect it and display an error message. 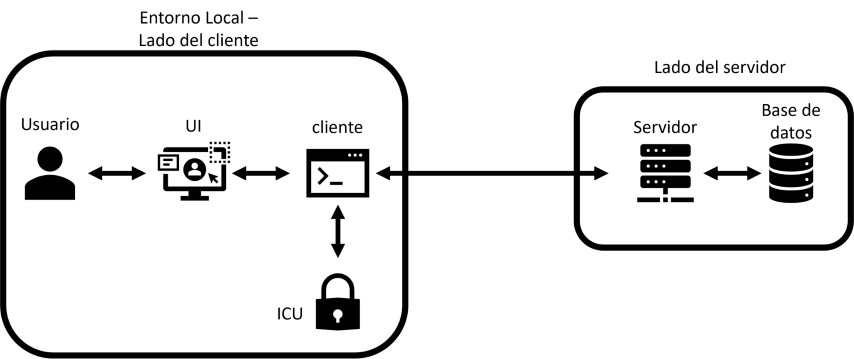
It should be noted that the system is not truly distributed, since the server and client are on the same machine and are represented as two different classes of the same application. This is only a simplification to show how the system works.
If you wanted to deploy the system in a real environment, you would have to separate the server and client onto two different machines and implement a communication system between them, such as a REST API.
Login and user account management
Registration
- Connect to the server and check the validity and trustworthiness of the certificate.
- User enters username and password.
- Convert the password to binary.
- Encrypt the password with the server’s public key.
- The server checks if the user already exists.
- If not, it decrypts the password with its private key and checks that it is valid.
- If valid, a HASH (KDF with Scrypt) of the password is generated and stored in the database. This way, the server does not store user passwords.
- A confirmation message is sent to the user.
Login
- Connect to the server and check the validity and trustworthiness of the certificate.
- User enters username and password.
- Convert the password to binary.
- Encrypt the password with the server’s public key.
- The server checks if the user exists.
- If they exist, the password is decrypted with their private key.
- The password’s HASH (KDF with Scrypt) is generated and compared with the one stored in the database.
- If it is valid, a confirmation message is sent to the user.
Image encryption and sending

- The image is loaded into the application and the range of pixels to be encrypted is selected.
- The server certificate is checked.
- The section of the image is encrypted.

- A random salt is generated.
- An encryption key is generated with the salt and the user’s password (NOT THE HASH) using PBKDF2HMAC.
- A random IV is generated.
- The IV, salt, algorithm used, and encrypted image section are written to the image metadata.
- The section of the image is encrypted with AES in CTR mode.
- The image is signed with the client’s private key.
- A random key is generated.
- A hash is generated with SHA256 from the image binary, the IV, the salt, and the key.
- The hash is signed (encrypted) with the client’s private key.
- The key used to generate the hash is encrypted with the server’s public key.
- The signed hash and encrypted key are written to the image metadata.
- The image is sent to the server.
- The server checks the client’s certificate and credentials.
- The key is decrypted with the server’s private key.
- The hash is regenerated with SHA256 from the image binary, the IV, the salt, and the key.
- The hash signature is verified with the client’s public key.
- The image is stored.
This way, the server does not have access to the original image or the user’s password, so it cannot decrypt the image.
Downloading and decrypting images
- Connect to the server and check the validity and trustworthiness of the certificate.
- Request the image(s) to be decrypted from the server. As these are public, they are sent without credential verification.
- Each image is decrypted:
- The IV, salt, and section of the encrypted image are read from the metadata.
- The encryption key is regenerated with the salt and the user’s password.
- The section of the image is decrypted with AES in CTR mode.
- The original image is reconstructed.
- The image is displayed to the user.
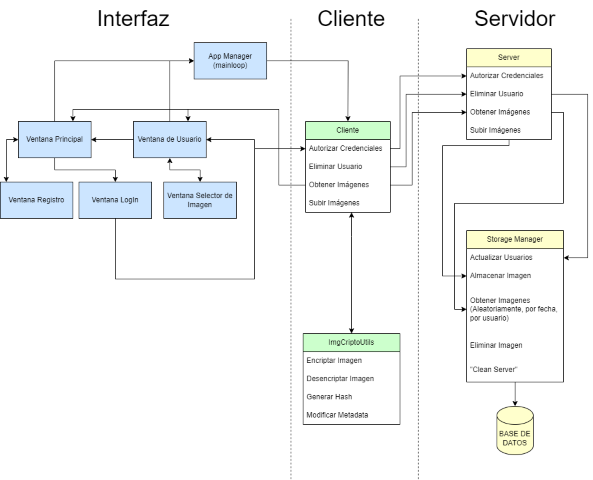
Project structure
Links of interest
Project report
The first part of the project report can be found at the following link: 1st project report
The second part of the project report can be found at the following link: 2nd project report
Project repository
The source code for the latest version of the project can be found at the following link: Project repository